

Do you find it challenging to draw high heel shoes? Many artists do. But don’t worry, in this tutorial you will learn how to draw high heels step-by-step following really simple instructions. The tutorial is suitable for beginners and before you know you will draw shoes with the confidence that the result will be perfect every time. This tutorial is focused on how to draw heels from the side, but if you are looking for more variations check out the “How to draw high heels from the front” tutorial and my other amazing Shoe drawing tutorials


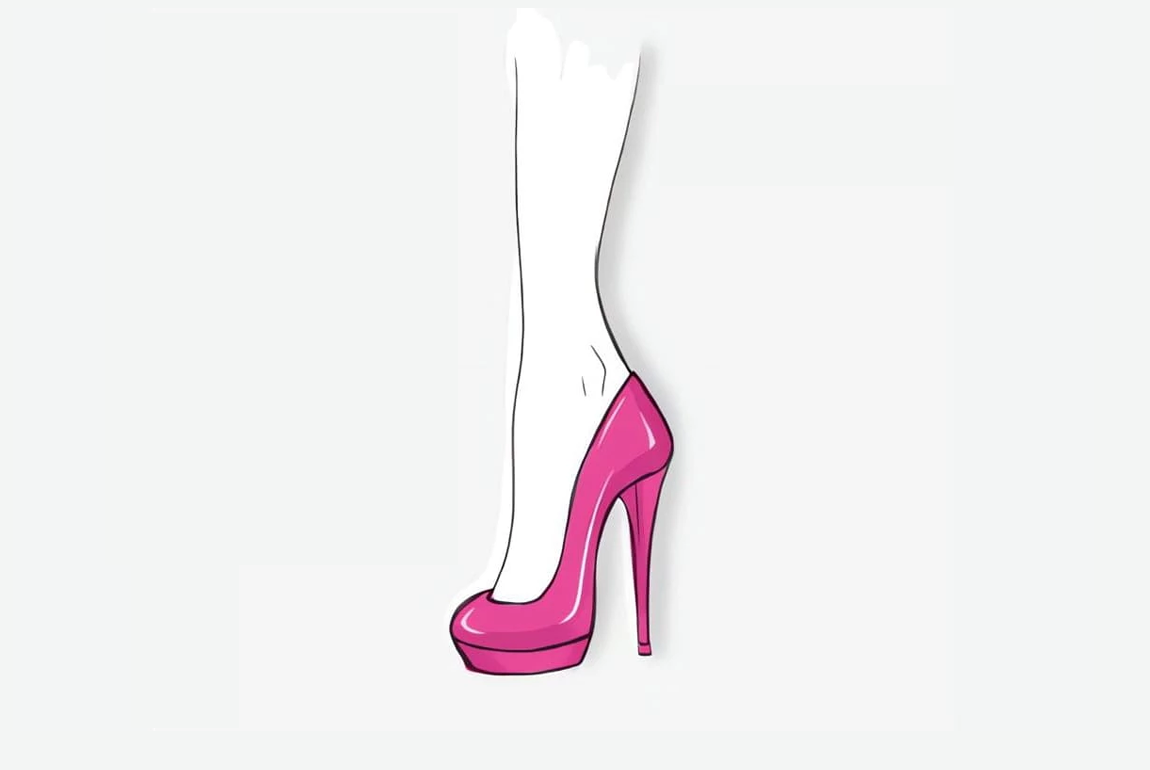
Step 1: Measure the size of the foot
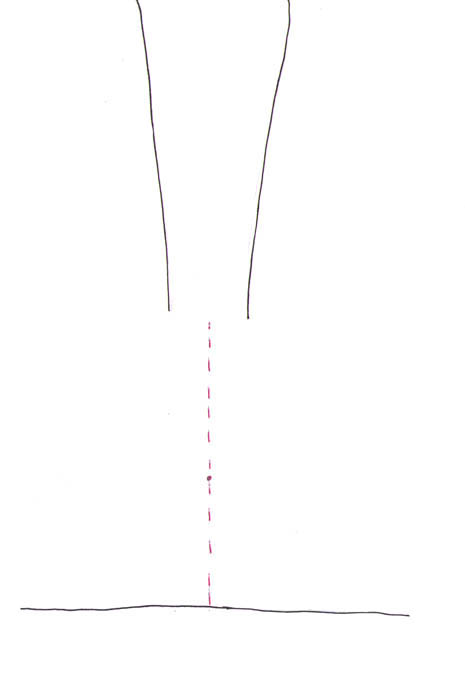
Start with drawing the leg of your model. Leave some empty space to draw the foot and mark the floor level.
From the ground up, draw a Centerline that’s a half-head long. If you are not drawing a whole figure, but just the foot it should be 4x the width of the leg just over the ankle. Use a small point to mark the middle of the line.
Step 2: The “2:35” rule
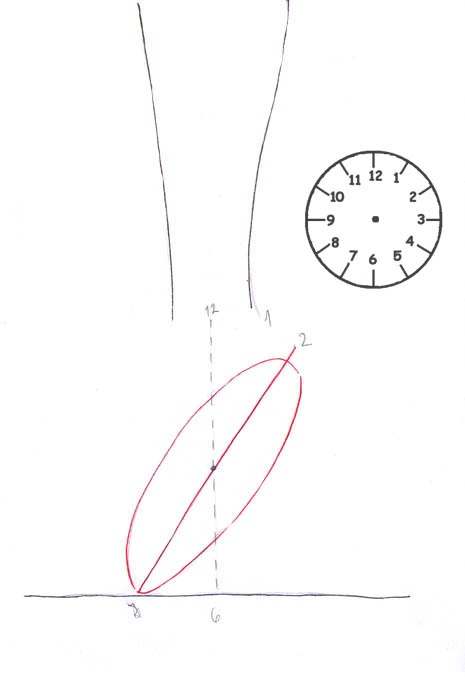
One of the biggest questions, when you draw high heels, is how to find the current angle of the foot?
There is a very simple way. Think of the clock. If the Centerline was the clock’s arms the time would be 12:30. Right?
Now draw a second guideline with the same length as the first one, but let is show 2:35. Close it within an ellipse as shown in the illustration.
This tutorial is shows my technique to draw high heels that are quite dramatic and extreme. If you want to draw heels that are more comfortable, simply move the “clock arms” to 3:40
Step 3: Heel and Toes
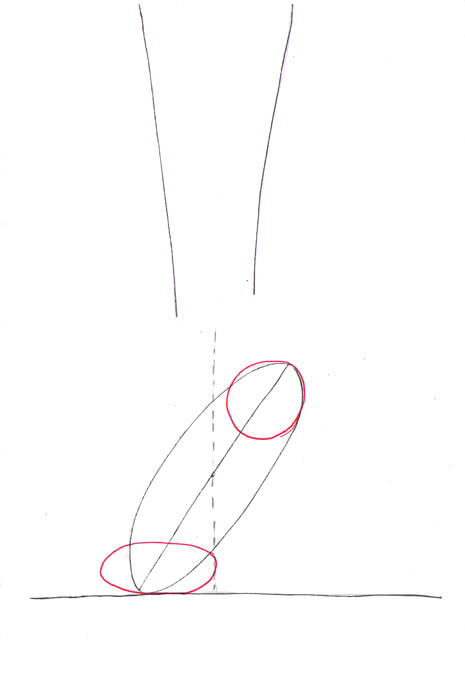
In the upper corner of the ellipse draw a circle. Use the ellipse’s size as a reference.
In the lower corner draw an ellipse that touches the Centerline. The 2:35 o‘clock line should pass through the middle of the ellipse. This is for the toes.
Step 4: Draw the high heels sole
Connecting the circle and the ellipse draw the foot arch. Note that under the heel the curve is straight.
Mark the place of the ankle. It’s situated closer to the Centerline than to the leg outline.
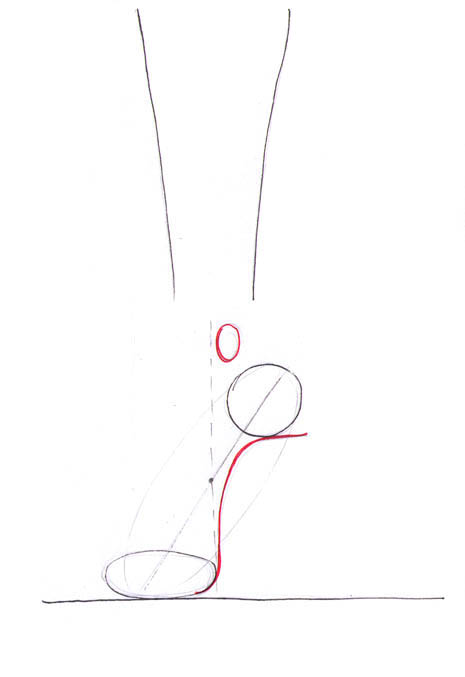
Step 5: Draw the Ankle
Draw the ankle and join the heel with the leg. Draw a triangle under the heel. We will use it as a guideline for the shoe heel.
Pull a horizontal line from the heel circle’s midway and mark the middle of the toes ellipse.

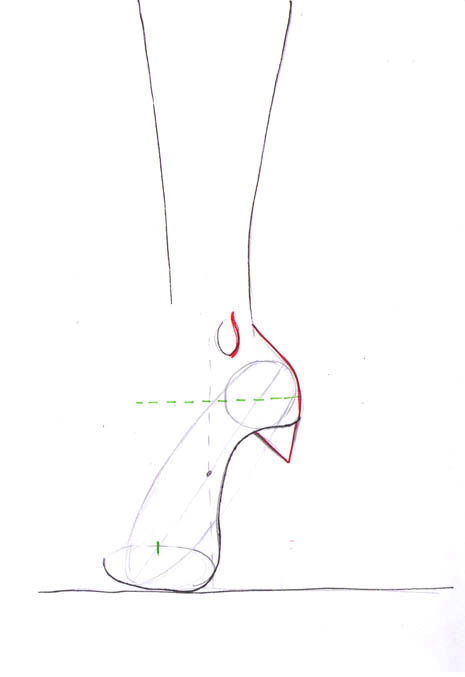
Step 6: Draw the shoe heel
Draw the heel. Use the little triangle to help you with the arch and make sure the heel is perpendicular to the ground surface.
Use the lines from step 5 to build the instep curve. The line pulled from the circle should mark the most bulging out section of the instep.

Step 7: Additional guidelines
Finish the toe box and draw new “clock arms” pointing 1:35 this time.

Step 8: Shoe contours
Refine the shoe contour. There is one thing that you need to remember when you draw high heels on feet and this is to make sure you always wrap the shoe around the foot.

I hope that my technique to draw high heels worked for you and you enjoyed the tutorial. I know it helps me every time for my fashion drawings. If the results weren’t perfect the first time, be patient and give it a couple more tries.
Happy drawing!







this was so so helpful!
OMG!!! when I found your website I thought oh my gosh this is going to be so good this can help me with my carer! I was right
Hi, I only found your website a few days ago but it is soo helpful. This helped me to draw proper shoes. Before that, my shoes and feet are the size of an ant. LOL XD I’ll need some improvement but otherwise, it worked really well!! Thank you so much. :)
Excellent work. I like this. That’s a good idea. thanks for sharing this great post. I provide for by my given business.
I LOVE this website. i only discovered it a couple days ago but now it’s my favorite! I hope to design my own clothes when I grow up.
Helped me ALOT!! Love the website… My favorite.
Im from Nigeria and thiss has helped me a lot
Amazing website! you have good and nice collection Thanks for sharing such a amazing collection with us.
Jessica Buurman
Hi im from iran . I love your site now im 13 and i draw fashion alot when i grow up i would like to be a dress designer
thank you soo much
Really awesome things. Helps alot.
What a brilliant site you have here. You found a niche and roked the hell out of it. THis is a one of kind gem, thanks for sharing your talents.
hi ur designs are seriously cool….but this one…can u make it slightly easier…the degree part really confuses me….I refer to ur website only and my designs r gradually improving….
Така не се рисува. Дори за мода. Така моделите падат на земята, защото нямат баланс. И аз рисувах така в 3-4ти клас. Повече, академично рисуване, иначе не стои добре. Дори когато се стилизира, трябват основни неща. Успех!
i like this blog……………….visit our sites for getting high heels on another stylish trendy footwear or clothes.
Thanks for this interesting post……………………visit our sites for getting high heels on another stylish trendy footwear or clothes.
Nice blog on high heel sandal……………..visit our sites for getting high heels on another stylish trendy footwear or clothes.
Such a great interesting post!
Such a great interesting post!
high heel stilettos shoes should always be worn in moderation. It is important that each woman understands for how long she can wear high heel stiletto shoes before causing permanent damage to her feet or legs.
:lol: :lol: :lol: :lol: :cry: :oops: :o :o looooove it!
super cool :lol:
good day:) it’s my first time here but i really enjoy what you posts here in your site cheap wedding dresses.i will always visit your site for more updates. Lots of Good information in your posting High Heel Pumps, I bookmarked your blog post so I can visit again in the near future, Cheers :)
Thanks for taking the time to discuss this womens high heels, I feel strongly about it and love learning more on this topic wedding party dresses. If possible, as you gain expertise, would you mind updating your blog with more information? It is extremely helpful for me.I will bookmark your blog and have my kids check up here frequently cheap wedding dresses. I’m very certain they will understand lots of new stuff here than anybody else. I do appreciate that youve added relevant and intelligent commentary here though. Thank you!
Great!!totally great! My portfolio is stuffed with sketches I learned here! :D :lol: :-) ;-) :P :roll:
That is really good but….not exactly mine… :-*
Hey Maria how are you how’s life going i don’t know how to draw fashion people can you get me so tips on how to draw thank you have a good day
This really helped me draw heel high shoes because i like to draw anime and manga and i can never figure out how to draw the shoes. :lol: :-) ;-) :roll:
I’m tel da truf I don’t no. How do dis
I’m telling da truf but I can’t draw dis
[quote name=”Maliha”]Can you please show us how to draw shoes showing from the front? :-)[/quote]
Hi, The new “How to draw front view shoes” totorial you can find here:
https://idrawfashion.com/accessories/shoes/143-how-to-draw-front-view-shoes
Enjoy!
thx that was reeeeeally helpful :lol: :D :-) 8)
Can you please show us how to draw shoes showing from the front? :-)
please show more examples!!! :oops:
Thanks for this :-)
I love this! My high heels have always been so lopsided and ugly . Thanks so much! Can you please make a tutorial on combat boots, sneakers, and sandals? :lol:
Thanks a lot
I really want to draw the shoes design .
It really useful to me :roll:
:lol: ganda
Good job guyss…….too bad i SUCK :sad:
You really helped my mom find shoes for her Graduation :lol: :lol: :lol:
:-) Awesome!
:lol: this is a good picture of a high heel :D
now my sister is proud that i drew her a high heel :lol:
Very nIce And good Explanation gOood job ;-) :-)
Nice :lol:
omg, thank you so much! i have a project for shoes in art and this made life so much easier!! :D
That was awazing! But I was wondering if you could make a high heel tutorial but front view.
Thanks!
really cool and easy
OMG, this is incredibly amazing!
I loooove it! :roll:
Can you do the tutorial from the front view?
omg this was easy-beasy… the “HOW TO DRAW” makes it so much easier for me to draw/design my sketchers…
:lol:
love this!!!!!!!!!!!!!!!!!! ;-)
what are some websites i can color and make my fashio sketches more visual
amazing :D :lol: :P
:zzz :roll:
Hi Teya! :-) Your drawing is amazing! Could you make a tutorial about flat shoes? I have some trouble drawing shoes :(. I would be really happy if you make one!^_^
This eas awesome information. Thanks kitsten
Why is the high heel so tall it looks uncomfortable.
Even for when I draw to my art. :eek:
[quote name=”Alexandra”]I discovered your site a few days ago and I really love it. Your tutorials are so useful but I have a question:
What do you use to color your sketches?[/quote]
Hey Alexandra :)
I’ve promised to make a tutorial on this, sooo stay tuned :)
It’s a combination of markers and pencils
I discovered your site a few days ago and I really love it. Your tutorials are so useful but I have a question:
What do you use to color your sketches?
NICE!! :D I thought it was going to be hard, but turns out it wasn’t! It took me only 20 minutes to do this including the shading. Thanks 8)
loved it!!!!! :-)
OMG i love it. I can finally draw high heels, I have alawys loved shoes and have been able to walk in heels since i was able to walk and now i can draw them. THX :-) :lol: :roll: :eek:
Ooh la la ! ;-) *thumbs up*
LOOOOOOVE THIS TUTORIAL!!!!! :D
:lol: HUGE HELP!!! Thanx so much!!!
this has helped me soooo much!!!! :D
Really helpful :lol: Thank you!!
thanx for the help! x :lol: ;-)
WOW I
[quote name=”mayachii
i really wish that one day i’ll be a highheel designer[/quote]
I don’t want to be a high heel designer, but I want to be a fashion designer and I feel that this tutorial has helped me very much. I think I’m going to use this tutorial for my Arts Award workshop. Thank you so much :lol: .
i loved it , its so amazing :oops: :P
i really wish that one day i’ll be a highheel designer
:lol: :lol: :lol: :lol: :lol: :lol: :lol: :lol: :lol: :lol: :lol: :lol: :lol: :lol: :lol: :lol: :lol: :lol: :lol: :lol: :lol: :lol: :lol: :lol: :lol: :lol: :lol: :lol: :lol: :lol: :lol: :lol: :lol: :lol: :lol: :lol: :lol: :lol: :lol: :lol: :lol: :lol: :lol: :lol: :lol: :lol: :lol: :lol: :lol: :lol: :lol: :lol: :lol: :lol: :lol: :lol: :lol: :lol: :lol: :lol: :lol: :lol: :lol: :lol: :lol: :lol: :lol: :lol: :lol: :lol: :lol: :lol: :lol: :lol: :lol: :lol: :lol: :lol: :lol: :lol: :lol: :lol: :lol: :lol: :lol: :lol: :lol: :lol:
this was so helpful. im working on a pair of figures i printed of ur site and this helped a lot
:lol: :lol: i live to wear heels
realy nice i love this website :P :lol: :roll: :-) ;-)
[quote name=”madison”]I love the high heel shoe it’s a cute design but I think mine came out a little wrong I think but I love drawing shoes it helped me a lot. :lol: :D ;-) 8) :P :roll: :lol: :lol: :lol: :D :D :-) :-) :-) :-) :-) :-) :-) :-) :-) 8) 8) 8) 8) 8) 8) 8) 8) 8)[/quote]
Same here! This helped a lot thanks!!!Love this website!!!
wow thanx alot :D :D :D :D :D :D :D :lol: :lol: :lol: :lol: :lol: :lol: :lol: :-) :-) :-) :-) :-) :-) :-) :-) ;-) ;-) ;-) ;-) ;-) ;-) ;-) ;-) 8) 8) 8) 8) 8) 8) 8) :-| :-| :-| :-| :-| :-| :-* :-* :-* :-* :-* :-* :-* :oops: :oops: :oops: :oops: :sad: :sad: :sad: :sad: :sad: :sad: :oops: :cry: :cry: :cry: :cry: :cry: :cry: :cry: :o :o :o :o :o :o :o :-? :-? :-? :-? :-? :-x :-x :-x :-x :-x :eek: :eek: :eek: :eek: :eek: :zzz :zzz :zzz :zzz :zzz :P :P :P :P :P :P :roll: :roll: :roll: :roll: :roll: :roll: :sigh: :sigh: :sigh: :sigh: :sigh: :sigh:
:-x :-? :o :sad: :cry: :oops: 8) :D :lol: ;-) :-) :P :roll: :sigh: :zzz :eek: :-? :cry: :cry: :sad: :sad: :sad: :oops: :-* 8) :-)
[quote name=”High Heel Pumps”]good day:) it’s my first time here but i really enjoy what you posts here in your site cheap wedding dresses.i will always visit your site for more updates. Lots of Good information in your posting High Heel Pumps, I bookmarked your blog post so I can visit again in the near future, Cheers :)[/quote]
Thank you for the comment! I am uploading new stuff every week – tutorials, figure templates, requested stuff from visitors….and I’m adding right now the “Wedding dress tutorial” to my list :) Keep in touch !
That good
[quote name=”hope”]this tutorial is so helpful!! it helped me with my drawing shoes. thank you so much..
can you do from anther Angle? plzzz it would be so great![/quote]
Thanks for the comment, I’m glad you enjoyed it! I will release a how to draw shoes in front view soon. Keep in touch :)
this tutorial is so helpful!! it helped me with my drawing shoes. thank you so much..
can you do from anther Angle? plzzz it would be so great!
I love the high heel shoe it’s a cute design but I think mine came out a little wrong I think but I love drawing shoes it helped me a lot. :lol: :D ;-) 8) :P :roll: :lol: :lol: :lol: :D :D :-) :-) :-) :-) :-) :-) :-) :-) :-) 8) 8) 8) 8) 8) 8) 8) 8) 8)
pinttttttttaaaaaaaaaaaaaa
Nice 8) 8) 8)
Definetely helped me with drawing shoes, which i’m just awful at.